序言
以图搜图系统指的是从图像内容提取特征向量,然后使用向量数据库进行向量数据的插入、删除、相似性检索等操作,进而提供根据图像内容搜索出具有相似内容的其它图像的功能。
系统架构
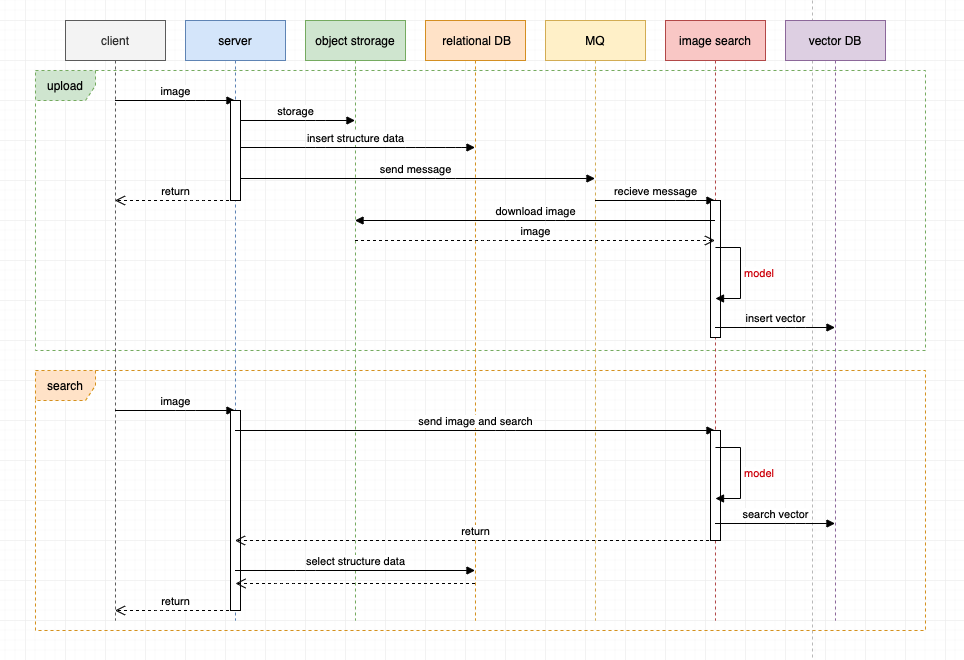
典型的搜图系统整体架构时序图如下:

图像上传过程:
- 客户端上传图像到服务端。
- 服务端存储图像至对象存储、插入结构化数据至关系型数据库、发送消息至 MQ 消息队列。
- 服务端对客户端请求返回响应。
- 图像搜索服务接受 MQ 的消息,下载图像内容,使用特定模型提取图像特征向量,然后将特征向量插入到向量数据库。
这里使用 MQ 的主要原因有:
- 异步快速响应,因为提取图像特征比较耗时,如果是同步的过程则会对客户端体验不友好。
- 解耦服务、服务异构,提取图像特征属于计算机视觉领域,编程语言生态基本是 Python ,而后端服务则常见于 Java、Golang、Node.js 等,这在架构上就要求服务异构和解耦。
- 削峰填谷,由于用户上传图像具有波峰波谷的天然特性,使用 MQ 可以使下游图像计算保持平稳。
图像搜索过程:
- 客户端上传图像到服务端。
- 服务端发起调用并将图像传递到图像搜索服务,图像搜索服务提取图像特征向量,然后查询向量数据库进行相似性搜索,最后返回向量搜索结果。
- 服务端根据向量搜索结果查询结构化数据,整合数据,最后响应。
我们可以看到以上系统中,比较耗时的有两部分:
- 图像传递链路长:客户端 -> 服务端 -> 对象存储 -> 图像搜索服务。
- 图像特征计算比较耗时、且比较消耗服务器资源。
使用客户端模型优化架构
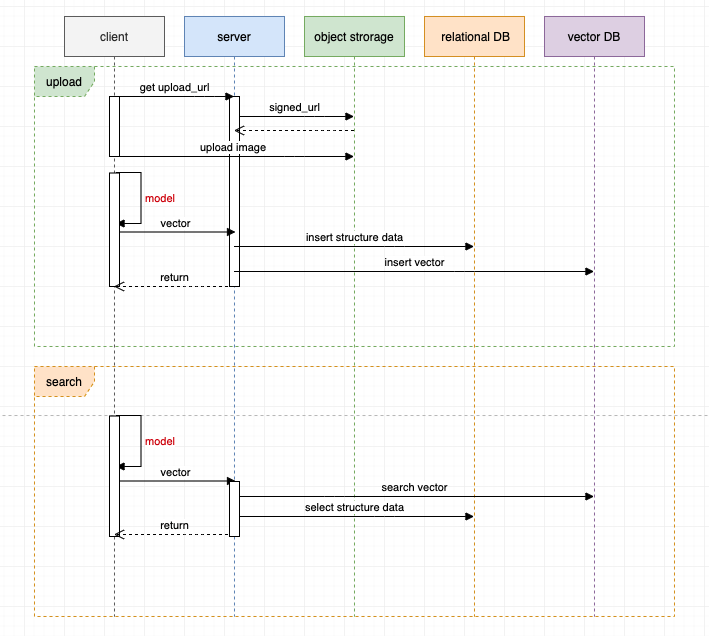
为了进一步优化系统架构,我们可以尝试使用客户端模型进行图像特征提取。

图像上传过程:
- 客户端向服务端请求对象存储的直传地址,然后客户端直接将图像内容传递到对象存储(需要对象存储支持直传操作)。
- 客户端进行本地计算,提取图像特征向量,然后传递特征向量和结构化数据给服务端。
- 服务端对结构化数据和向量数据分别插入到不同的数据库,完成响应。
图像搜索过程:
- 客户端进行本地计算,提取图像特征向量,然后传递特征向量和结构化数据给服务端。
- 服务端分别进行向量检索和结构化数据查询,整合数据,完成响应。
优化后的架构:
- 图像传递链路短,只有客户端 -> 对象存储。
- 图像特征计算卸载到了客户端完成,服务器不需要再消耗计算资源。
- 减少了 MQ 和图像搜索服务这两个构件,架构更加简单、复杂度降低。
客户端模型的可行性和约束
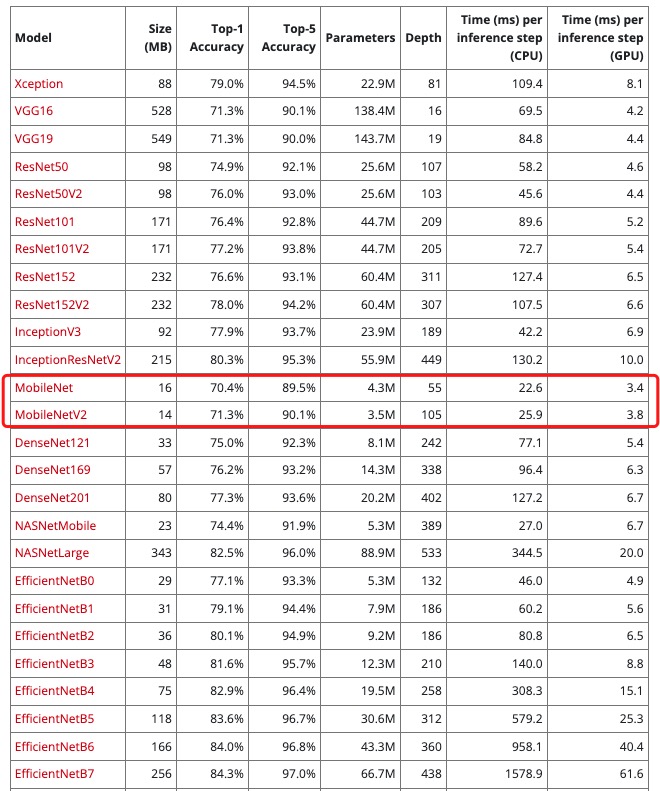
客户端相比于服务端具有硬件资源有限、且不可扩展的特点,因此这就要求客户端使用的模型要更小、计算消耗更少。

我们根据上图中的模型对比可以看到 mobilenet 这种模型更符合我们的需求(模型的名字就能看出来)。
示例
以下给出一个前端使用 mobilenet 完成图像特征提取的示例:
 1
 2
 3
 4
 5
 6
 7
 8
 9
10
11
12
13
14
15
16
17
18
19
20
21
22
23
24
25
26
27
28
29
30
31
32
33
34
35
36
37
38
39
40
41
42
43
44
45
46
47
48
49
50
51
52
53
54
55
56
57
58
59
60
61
| <!DOCTYPE html>
<html lang="en">
<head>
<meta charset="UTF-8">
<script src="https://cdn.jsdelivr.net/npm/@tensorflow/tfjs"></script>
<script src="https://cdn.jsdelivr.net/npm/@tensorflow-models/mobilenet"></script>
</head>
<body>
<input type="file" id="imageInput">
<button onclick="extractFeatures()">Extract Features</button>
<pre id="result"></pre>
<script>
let model;
async function loadModel() {
if (!model) {
// 加载模型时 mobilenet 会去 storage.googleapis.com 下载
model = await mobilenet.load({version: 2, alpha: 1.0});
}
return model;
}
function preprocessImage(image) {
const tensor = tf.browser.fromPixels(image)
.resizeNearestNeighbor([224, 224])
.toFloat()
.expandDims();
return tensor.div(255.0);
}
async function extractFeatures() {
const input = document.getElementById('imageInput');
if (input.files.length === 0) {
alert('Please select an image file first.');
return;
}
const model = await loadModel();
const timeStart = Date.now();
const file = input.files[0];
const reader = new FileReader();
reader.onload = async function (e) {
const image = new Image();
image.src = e.target.result;
image.onload = async function () {
const processedImage = preprocessImage(image);
const features = model.infer(processedImage, false); // 去掉最后的全连接层
const featuresArray = await features.array();
document.getElementById('result').textContent = JSON.stringify(featuresArray, null, 2);
console.log(`Extract feature spend: ${Date.now() - timeStart} ms`);;
}
}
reader.readAsDataURL(file);
}
</script>
</body>
</html>
|
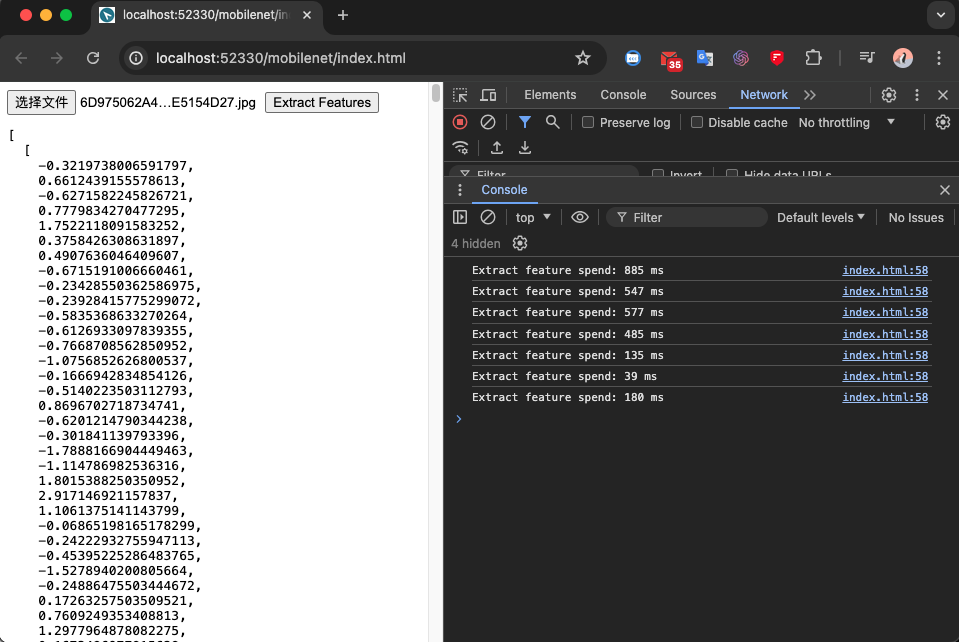
然后在我的笔记本电脑简单测试的结果:

从上图可以看到,在我的客户端处理一张图像可以在一秒内完成,当然实际耗时取决于硬件资源和图像大小。
最后,如果你对此类主题感兴趣,可以阅读我的其它相关文章。
参考资料:


